OSSEC for Amazon AWS
This section provides instructions to integrate OSSEC with Amazon AWS. It also explains different use cases as examples on how the rules, developed by Wazuh, can be used to alert on specific events. In our github repository there are rules for IAM, EC2 and VPC services.
The diagram below explains how a log message, generated by an AWS event, flows until it arrives to the OSSEC agent. Once the agent reads the message, it sends it to the OSSEC manager which performs the analysis using the rules. When a rule matches, an alert is triggered (if the level is high enough).

- CloudTrail is a web service that records AWS API calls for your account and delivers log files. Meaning that, when an AWS event occurs, Cloudtrail generates the log message. Using CloudTrail we can get more visibility into AWS user activity, tracking changes made to AWS resources.
- Once an event takes place, CloudTrail delivers the log message to Amazon S3, writing it to a log file. S3 allows log files to be stored durably and inexpensively.
- The script
getawslog.pydownloads the logs files fromAmazon S3into the OSSEC agent, uncompressing them and appending new data to a local plain text file.
This diagram makes it easier to understand the integration process described below.
OSSEC integration with Amazon AWS
Prior to the installation of the OSSEC rules for Amazon AWS, follow the steps below in order to enable AWS API to generate log messages and store them as JSON data files in Amazon S3 Bucket. A detailed description of each of the steps can be found further below.
- Turn on CloudTrail.
- Create a user with permission to access S3.
- Install Python Boto in your Ossec Agent.
- Configure the previous user credentials with AWS Cli in your Ossec Agent.
- Run the script getawslog.py to download the log JSON files and convert them into flat files.
- Install Wazuh Amazon rules.
Turn on CloudTrail
Create a trail for your AWS account. Trails can be created using the AWS CloudTrail console or the AWS Command Line Interface (AWS CLI). Both methods follow the same steps. In this case we will be focusing on the first one:
- Turn on
CloudTrail. Note that, by default, when creating a trail in one region in the CloudTrail console, this one will apply to all regions.
Warning
Please do not enable Enable log file validation parameter, it’s not supported by provided python script.
- Create a new Amazon S3 bucket or specify an existing bucket to store all your log files. By default, log files from all AWS regions in your account will be stored in the bucket selected.
Note
When naming a new bucket, if you get this error Bucket already exists. Select a different bucket name., then try a different name, since the one you have selected is already in use by other Amazon AWS user.
From now on, all the events in your Amazon AWS account will be logged. You can search log messages manually inside CloudTrail/API activity history. Note that every 7 min a JSON file containing new log messages will be stored in your bucket.
Create a user with permission to access S3
Sign in to the AWS Management Console and open the IAM console at https://console.aws.amazon.com/iam/.
In the navigation panel, choose Users and then choose Create New Users.
Type the user names for the users you would like to create.
Note
User names can only use a combination of alphanumeric characters and these characters: plus (+), equal (=), comma (,), period (.), at (@), and hyphen (-). Names must be unique within an account.
The users require access to the API. For this, they must have access keys. To generate access key for new users, select Generate an access key for each user and Choose Create.
Warning
This is your only opportunity to view or download the secret access keys, and you must provide this information to your users before they can use the AWS Console. If you don’t download and save them now, you will need to create new access keys for the users later. You will not have access to the secret access keys again after this step.
Give the user(s) access to this specific S3 bucket (based on http://blogs.aws.amazon.com/security/post/Tx3VRSWZ6B3SHAV/Writing-IAM-Policies-How-to-grant-access-to-an-Amazon-S3-bucket)
Under the IAM console, select Users and go to the Permissions tab, in the Inline Policies section, select the Create User Policy button. Click the Custom Policy option and push the Select button.
In the next page enter some Policy Name e.g. ossec-cloudtrail-s3-access and for Policy Document use the example provided below:
{
  "Version": "2012-10-17",
  "Statement": [
    {
      "Effect": "Allow",
      "Action": ["s3:ListBucket"],
      "Resource": ["arn:aws:s3:::YOURBUCKETNAME"]
    },
    {
      "Effect": "Allow",
      "Action": [
        "s3:GetObject",
        "s3:DeleteObject"
      ],
      "Resource": ["arn:aws:s3:::YOURBUCKETNAME/*"]
    }
  ]
}
Install Python Boto in your Ossec Agent
To download and process the Amazon AWS logs that already are archived in S3 Bucket we need to install Python Boto in the OSSEC agent and configure it to enable the connection with AWS S3.
Prerequisites for Python Boto installation using Pip
- Windows, Linux, OS X, or Unix
- Python 2 version 2.7+ or Python 3 version 3.3+
- Pip
Check if Python is already installed:
$ python --version
If Python 2.7 or later is not installed then, install it with your distribution’s package manager as shown below:
On Debian derivatives such as Ubuntu, use APT:
$ sudo apt-get install python2.7
On Red Hat and derivatives, use yum:
$ sudo yum install python27
Open a command prompt or shell and run the following command to verify that Python has been installed correctly:
$ python --version
Python 2.7.9
To install pip on Linux
Download the installation script from pypa.io:
$ curl -O https://bootstrap.pypa.io/get-pip.py
Run the script with Python:
$ sudo python get-pip.py
Now that Python and pip are installed, use pip to install boto:
$ sudo pip install boto
Configure user credentials with Python Boto
To configure the user credentials you need to create a file called /etc/boto.cfg looking like:
[Credentials]
aws_access_key_id = <your_access_key_here>
aws_secret_access_key = <your_secret_key_here>
Run the python script to download the JSON data
We use a python script to download JSON files from S3 Bucket and convert them into flat files that can be used with Ossec. This script was written by Xavier Martens @xme and contains minor modifications done by Wazuh. It is located in our repository at wazuh/ossec-rules/tools/amazon/getawslog.py.
Run the following command to use this script:
$ ./getawslog.py -b s3bucketname -d -j -D -l /path-with-write-permission/amazon.log
Where s3bucketname is the name of the bucket created when CloudTrail was activated (see the first step in this section: “Turn on CloudTrail”) and /path-with-write-permission/amazon.log is the path where the log flat file is stored once has been converted by the script.
Note
In case you don’t want to use an existing folder, create it manually before running the script.
CloudTrail delivers log files to your S3 bucket approximately every 7 minutes. Run the script adding a crontab job and note that running it more frequently than once every 7 minutes would be useless. CloudTrail does not deliver log files if no API calls are made on your account.
Run crontab -e and, at the end of the file, add the following line
*/5 * * * * /usr/bin/flock -n /tmp/cron.lock -c python path_to_script/getawslog.py -b s3bucketname -d -j -D -l /path-with-write-permission/amazon.log
Note
This script downloads and deletes the files from your S3 Bucket. However, you can always review the log messages generated during the last 7 days through CloudTrail.
Install Wazuh Amazon rules
To install Wazuh Amazon rules follow either the Automatic installation section or Manual installation section in this guide.
Use Cases
Our Rules focuses on providing the desired visibility within the Amazon AWS platform.
The following describes some use cases for IAM, EC2 and VPC services. The structure followed is always the same. You will see the definition of the rule that matches with the log message generated by the AWS event. You can check how this log message flows in the diagram at the beginning of this section. Also, in each of the examples, you will see a screenshot of how Kibana shows the corresponding alert. Remember that an alert is triggered when the log message matches a specific rule if its level is high enough.
Iam Use cases
AWS Identity and Access Management (IAM) enables you to securely control access to AWS services and resources for your users. Using IAM, you can create and manage AWS users and groups, and use permissions to allow and deny their access to AWS resources.
To follow find some use cases when using some of the Wazuh rules built for IAM.
Create user account
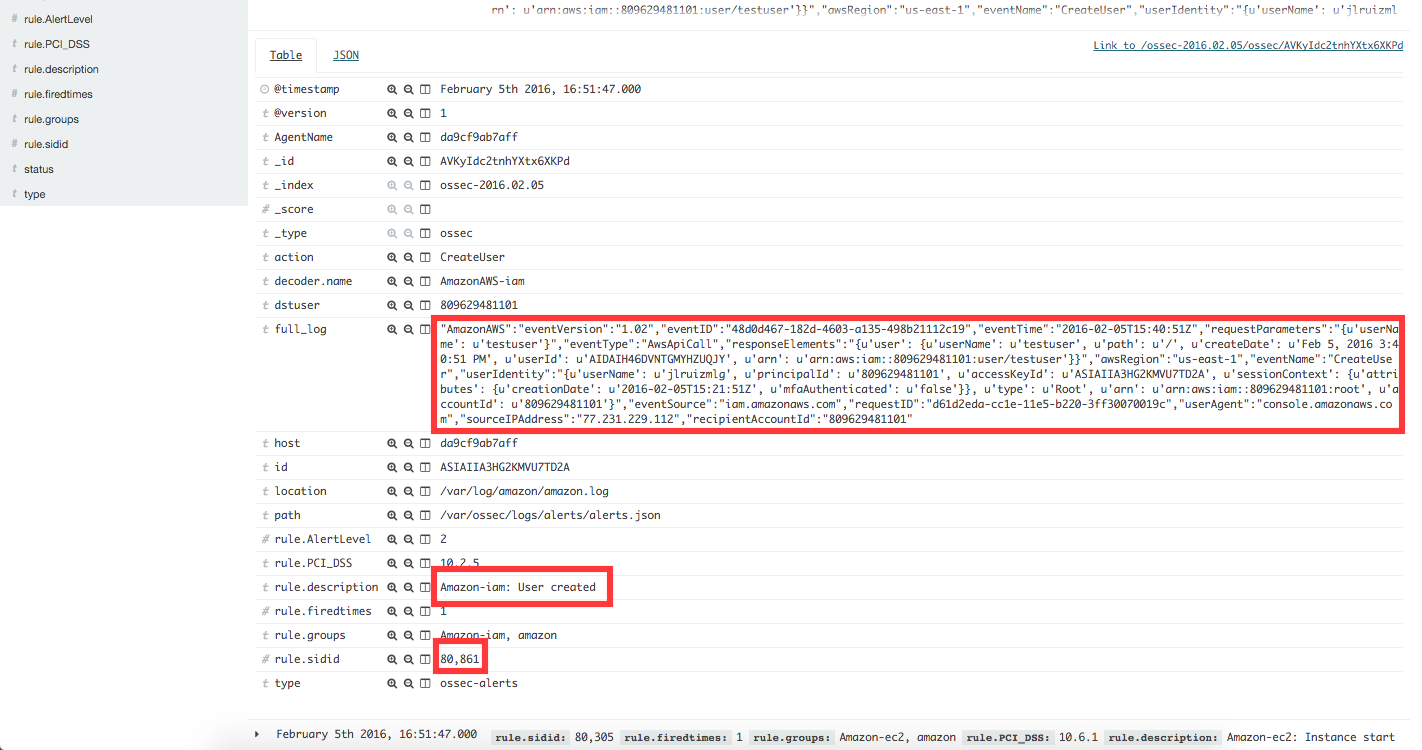
When we create a new user account in IAM, an AWS event is generated. As per the diagram at the beginning of this section, the log message flows until the OSSEC agent gets the log file and sends it to the OSSEC manager. The latter analyze the log file and finds that the log message generated by this event matches the rule with id number 880861. Due to this match, an alert is generated and Kibana will show it as seen below.
| Definition of rule 80861 |
<rule id="80861" level="2">
    <if_sid>80860</if_sid>
    <action>CreateUser</action>
    <description>Amazon-iam: User created</description>
    <group>amazon,pci_dss_10.2.5,</group>
</rule>
|
| Kibana will show this alert |
|
Create user account without permissions
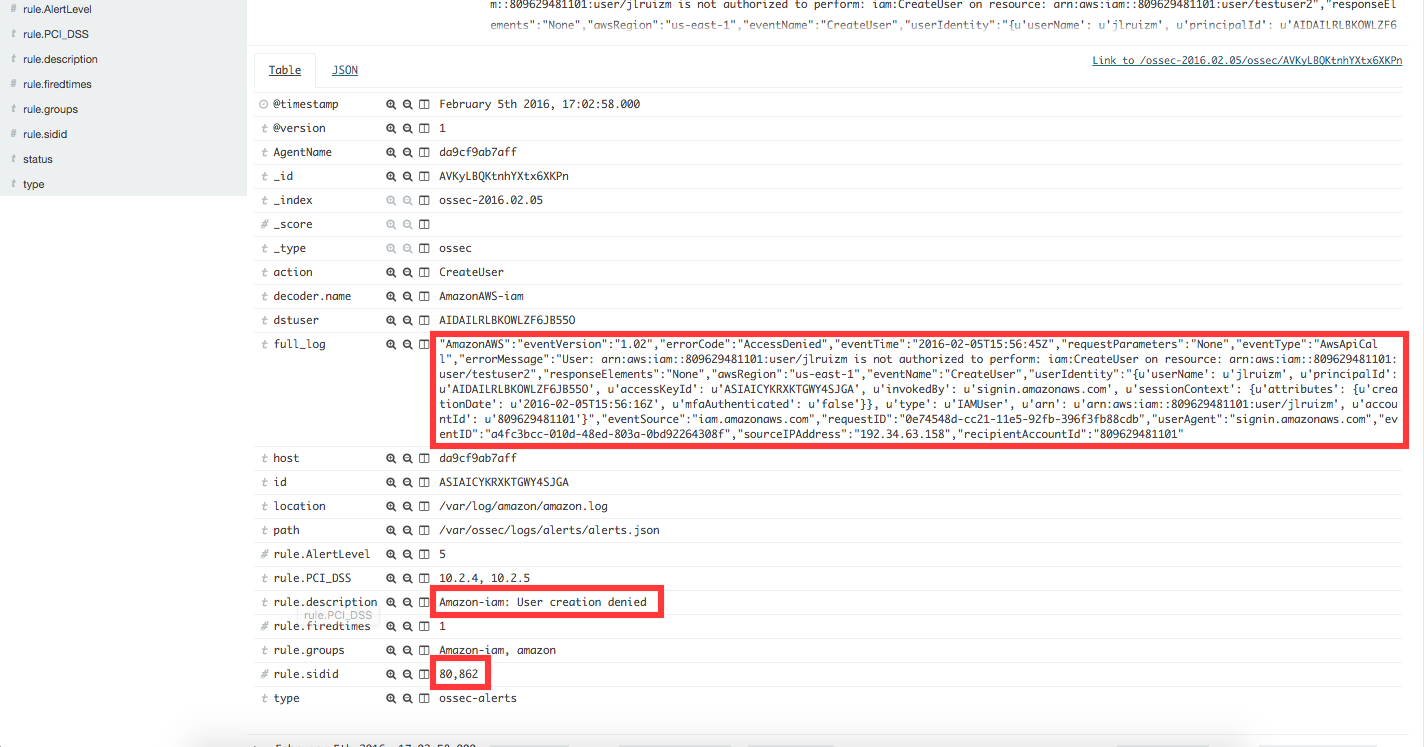
If the user that is creating a new user account doesn’t have permissions to create new users, then the log message generated will match the rule id 80862 and Kibana will show the alert as follows:
| Definition of rule 80862 |
<rule id="80862" level="2">
    <if_sid>80861</if_sid>
    <match>"errorCode":"AccessDenied"</match>
    <description>Amazon-iam: User creation denied</description>
    <group>amazon,pci_dss_10.2.4,pci_dss_10.2.5,</group>
</rule>
|
| Kibana will show this alert |
|
User login failed
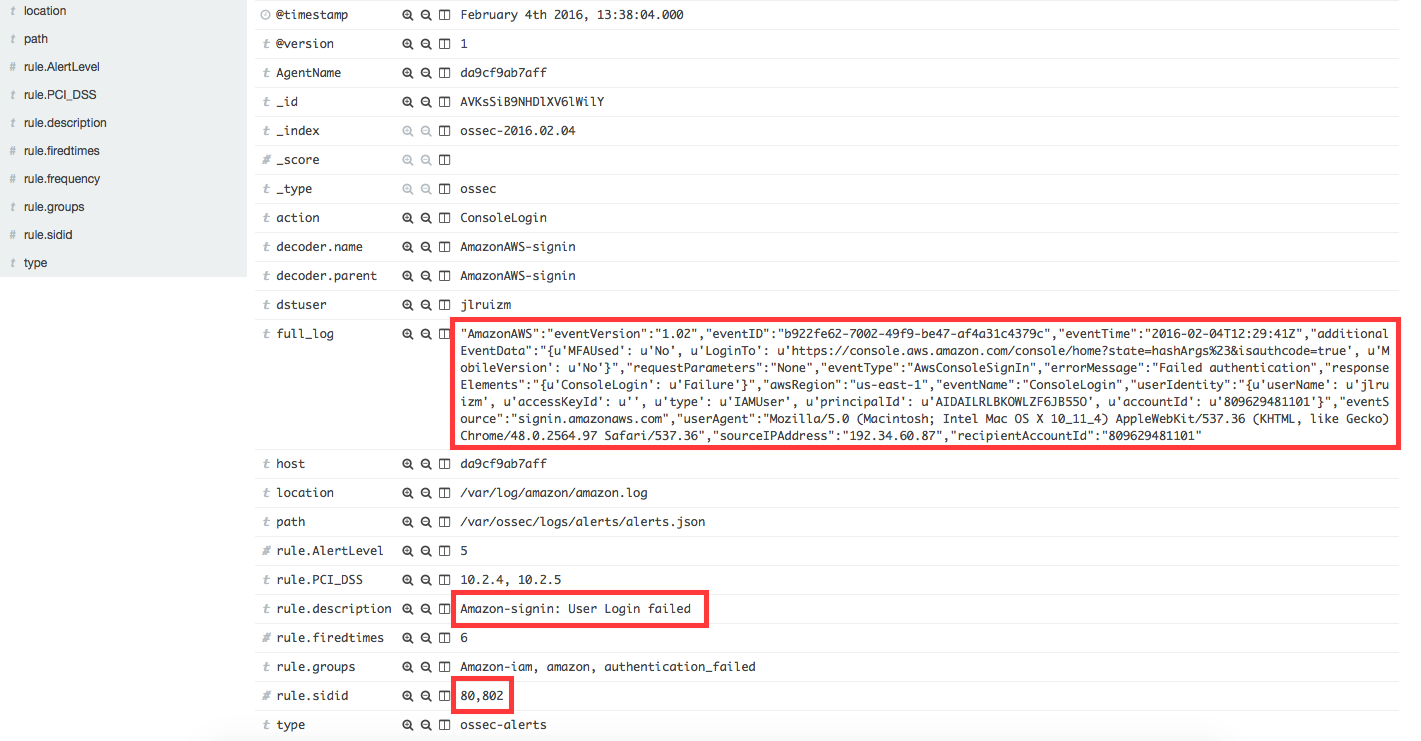
When a user try to log in introducing an invalid password, a new event, and therefore a new log message will be generated. This log message, once is analyzed by the OSSEC manager, will match the rule id 80802, generating an alert that will be shown in Kibana as follows:
| Definition of rule 80802 |
<rule id="80802" level="2">
    <if_sid>80801</if_sid>
    <match>'ConsoleLogin': u'Failure'</match>
    <description>Amazon-signin: User Login failed</description>
    <group>amazon,authentication_failed,pci_dss_10.2.4,pci_dss_10.2.5,</group>
</rule>
|
| Kibana will show this alert |
|
Possible break-in attempt
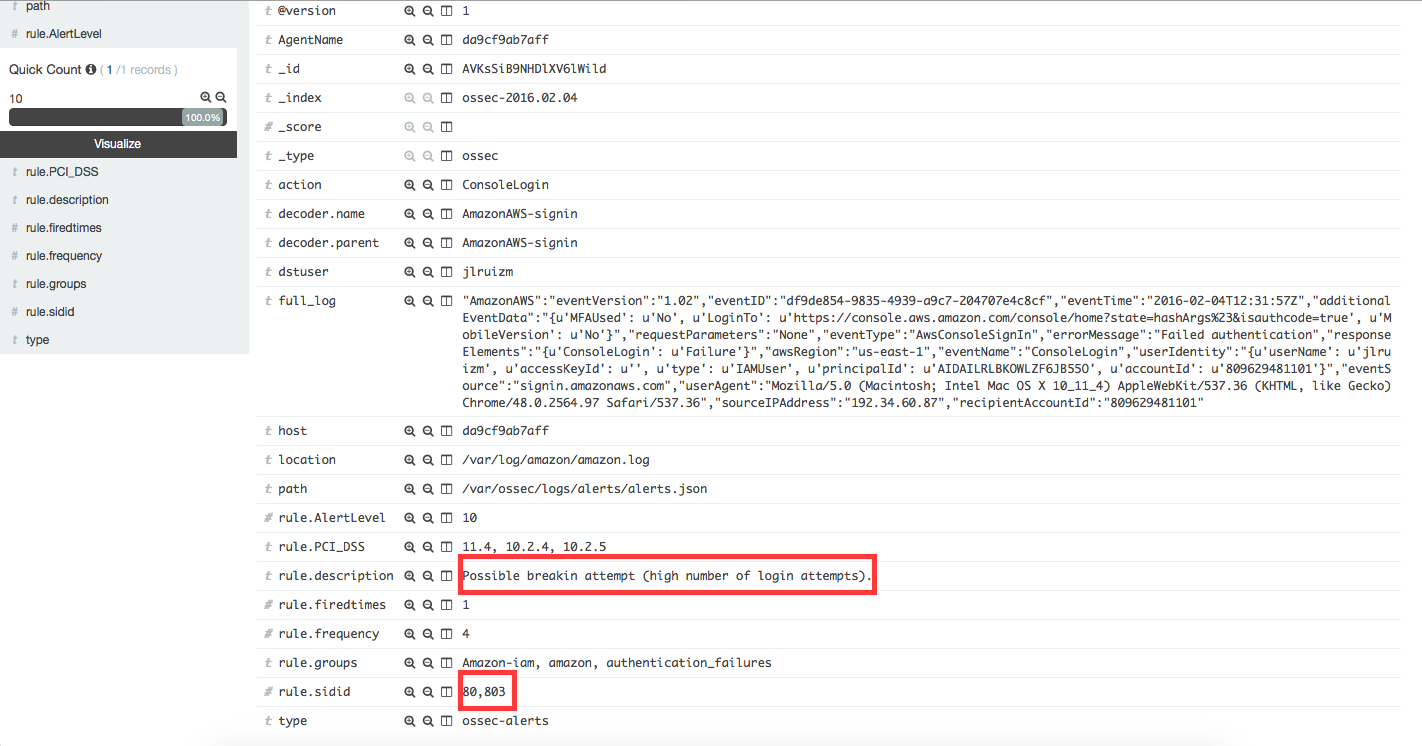
When having more than 4 incorrect access in less than 360 seconds the rule id 80803 will apply and an alert will be generated:
| Definition of rule 80803 |
<rule id="80803" level="10" frequency="4" timeframe="360">
    <if_matched_sid>80802</if_matched_sid>
    <description>Possible breakin attempt (high number of login attempts).</description>
    <group>amazon,authentication_failures,pci_dss_11.4,pci_dss_10.2.4,pci_dss_10.2.5,</group>
</rule>
|
| Kibana will show this alert |
|
Login success
After a succesful login the rule id 80801 will match the log message generated by this event and a new alert will be shown in Kibana:
| Definition of rule 80801 |
<rule id="80801" level="2">
    <if_sid>80800</if_sid>
    <action>ConsoleLogin</action>
    <description>Amazon-signin: User Login Success</description>
    <group>amazon,authentication_success,pci_dss_10.2.5,</group>
</rule>
|
| Kibana will show this alert |
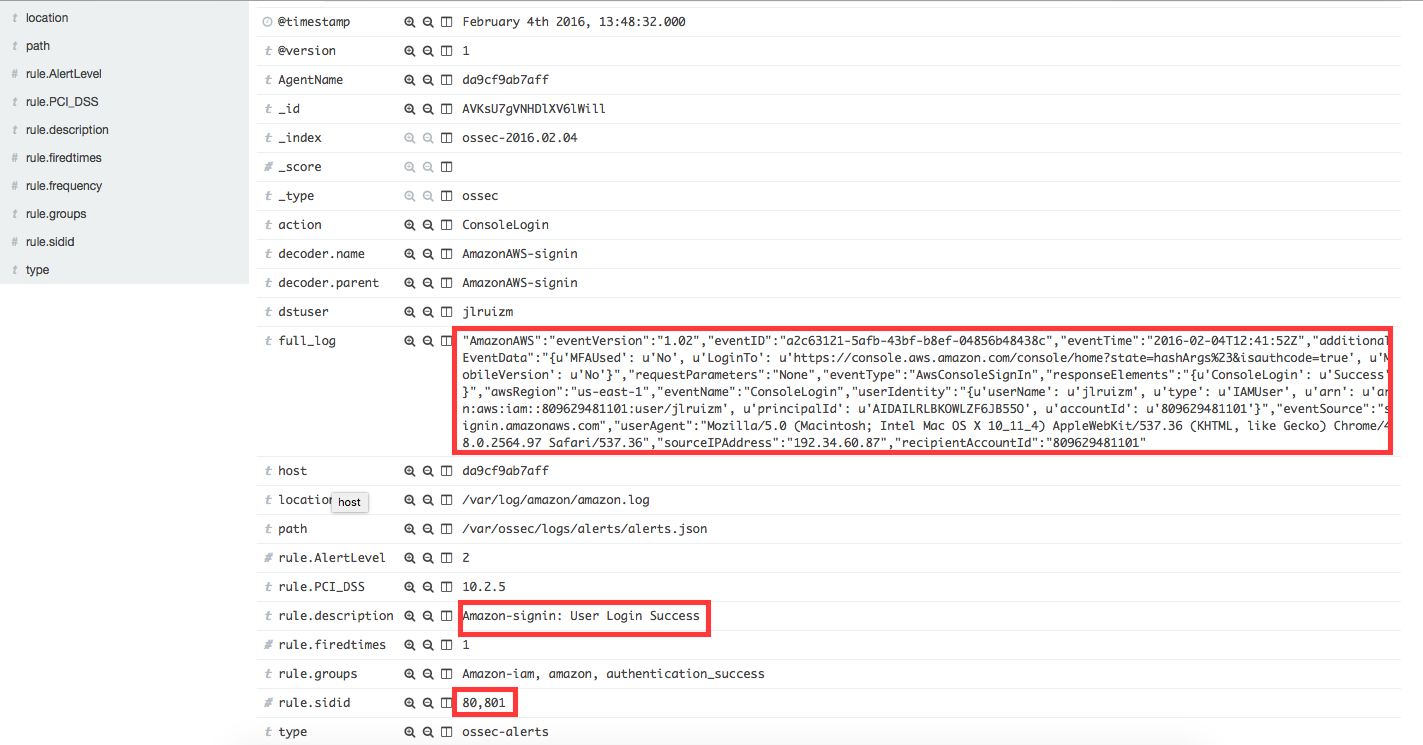
|
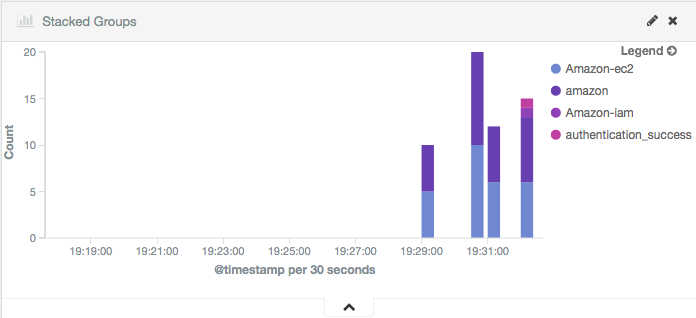
The Kibana Dashboards will show:
| Pie Chart | Stacked Groups |
|---|---|
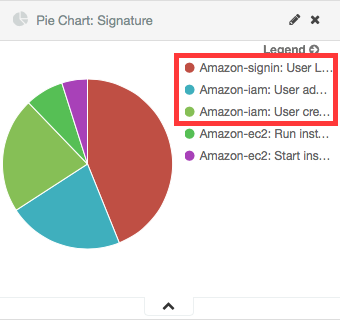
|
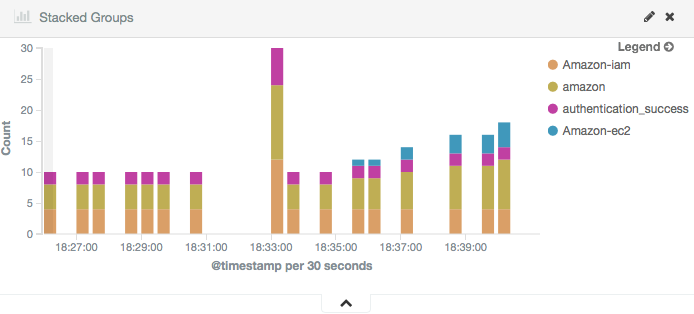
|
EC2 Use cases
Amazon Elastic Compute Cloud (Amazon EC2) is a web service that provides resizable compute capacity in the cloud. It is designed to make web-scale cloud computing easier for developers.
Amazon EC2’s simple web service interface allows you to obtain and configure capacity with minimal friction. It provides you with complete control of your computing resources and lets you run on Amazon’s proven computing environment. Amazon EC2 reduces the time required to obtain and boot new server instances to minutes, allowing you to quickly scale capacity, both up and down, as your computing requirements change. Amazon EC2 changes the economics of computing by allowing you to pay only for capacity that you actually use. Amazon EC2 provides developers the tools to build failure resilient applications and isolate themselves from common failure scenarios.
To follow find some use cases when using some of the Wazuh rules built for EC2.
Run a new instance in EC2
When a user runs a new instance in EC2, an AWS event is generated. As per the diagram at the beginning of this section, the log message flows until the OSSEC agent gets the log file and sends it to the OSSEC manager. The latter analyzes the log file and finds that the log message generated by this event which matches the rule with id number 80301. Due to this match, an alert is generated and Kibana will show it as seen below:
| Definition of rule 80301 |
<rule id="80301" level="2">
    <if_sid>80300</if_sid>
    <action>RunInstances</action>
    <description>Amazon-ec2: Run instance</description>
    <group>amazon,pci_dss_10.6.1,</group>
</rule>
|
| Kibana will show this alert |
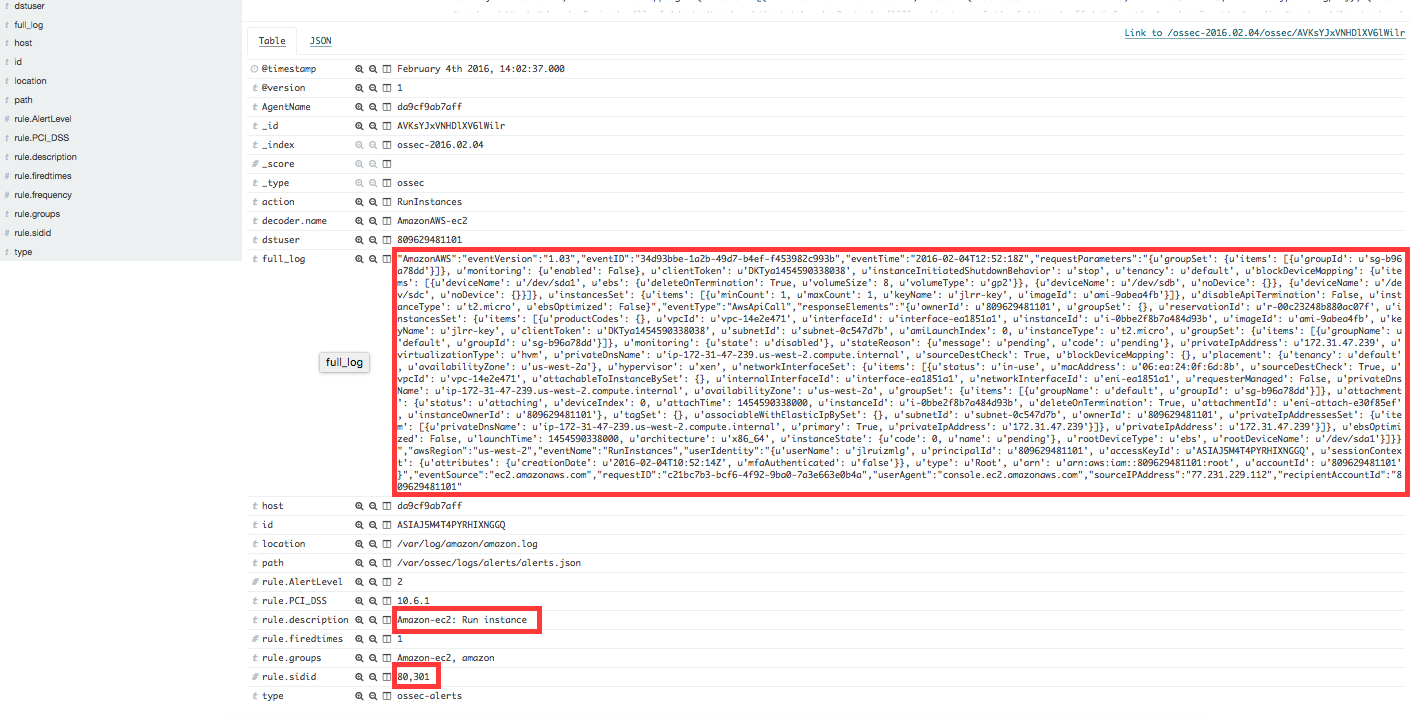
|
When a user without permissions tries to run an instance, then the log message will match the rule id 80303 and an alert will be generated as seen below:
| Definition of rule 80303 |
<rule id="80301" level="2">
    <if_sid>80301</if_sid>
    <match>"errorCode":"Client.UnauthorizedOperation"</match>
    <description>Amazon-ec2: Run instance unauthorized</description>
    <group>amazon,pci_dss_10.6.1,</group>
</rule>
|
| Kibana will show this alert |
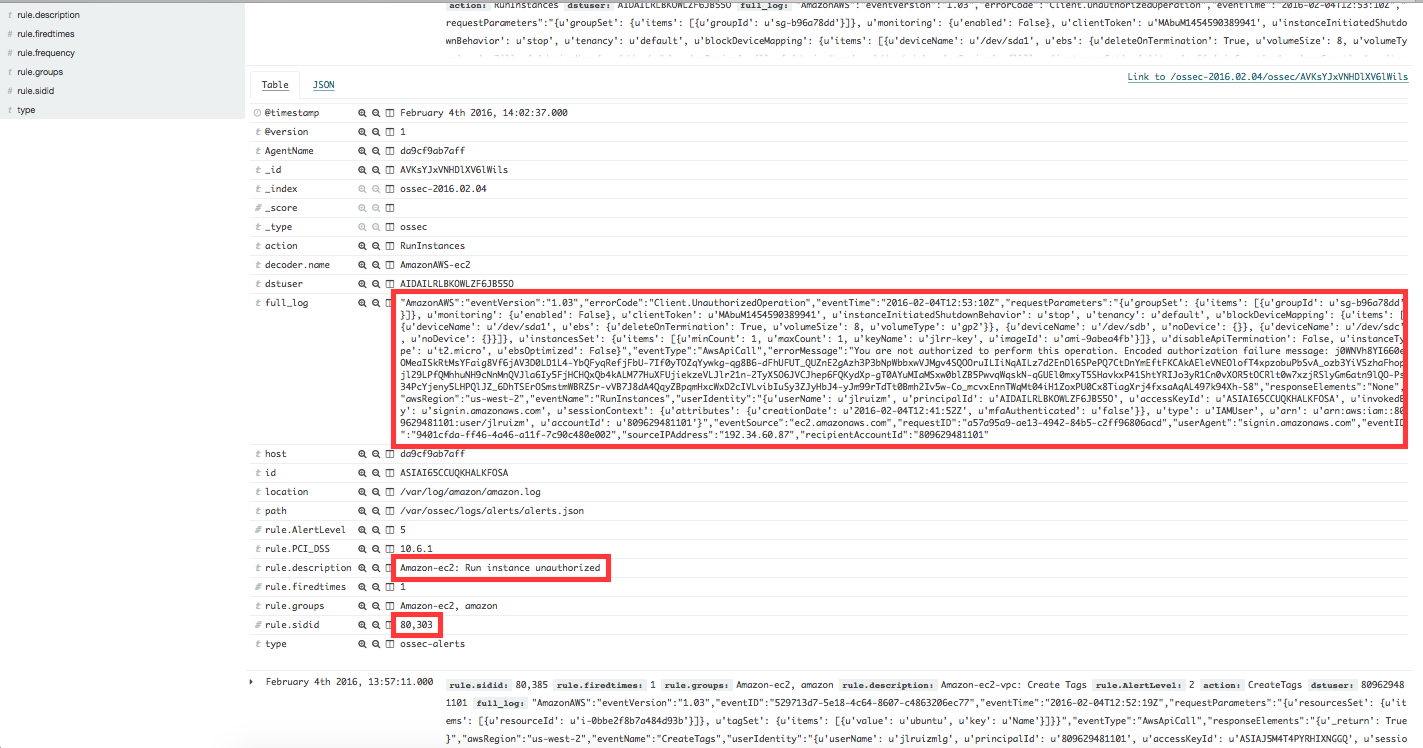
|
Start instances in EC2
When one instance in EC2 is started, the log message will match the rule id 80305 and an alert will be generated as shown below:
| Definition of rule 80305 |
<rule id="80305" level="2">
    <if_sid>80300</if_sid>
    <action>StartInstances</action>
    <description>Amazon-ec2: Instance started</description>
    <group>amazon,pci_dss_10.6.1,</group>
</rule>
|
| Kibana will show this alert |
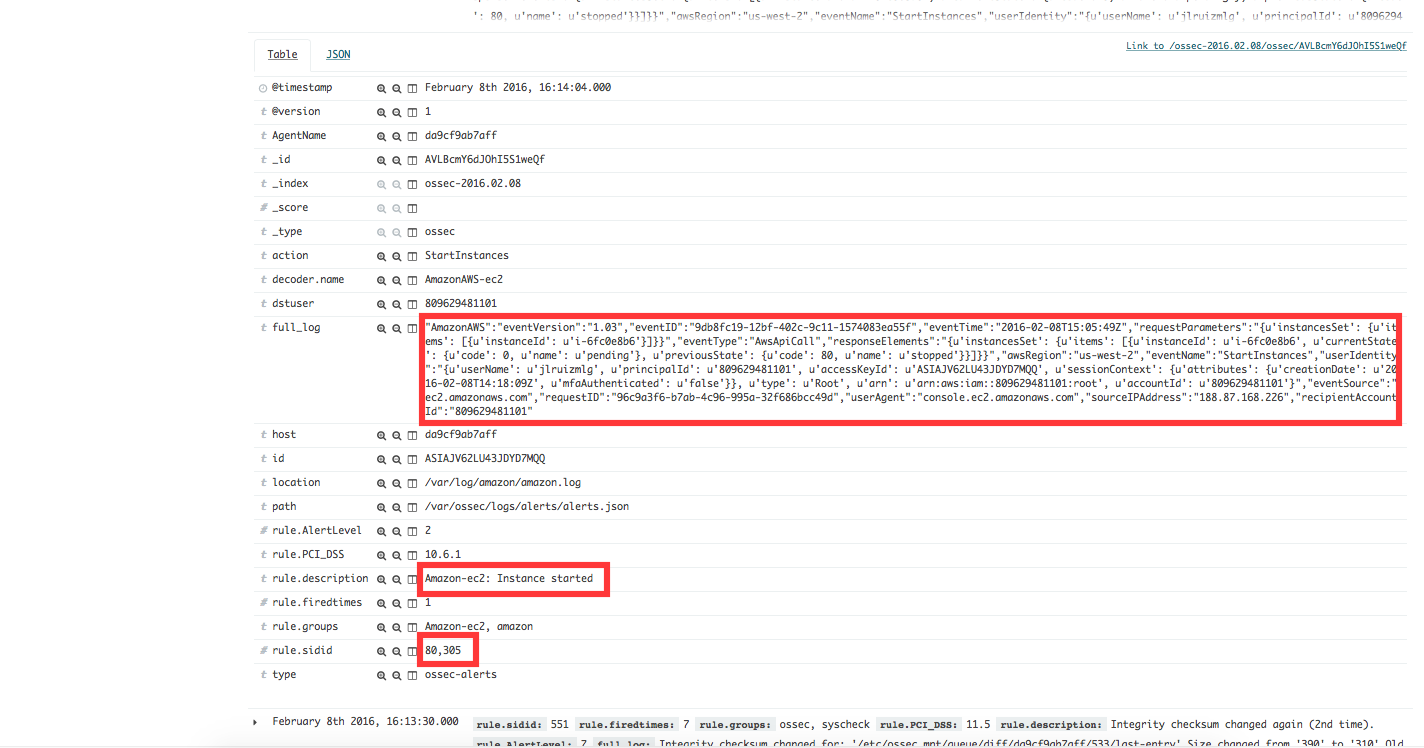
|
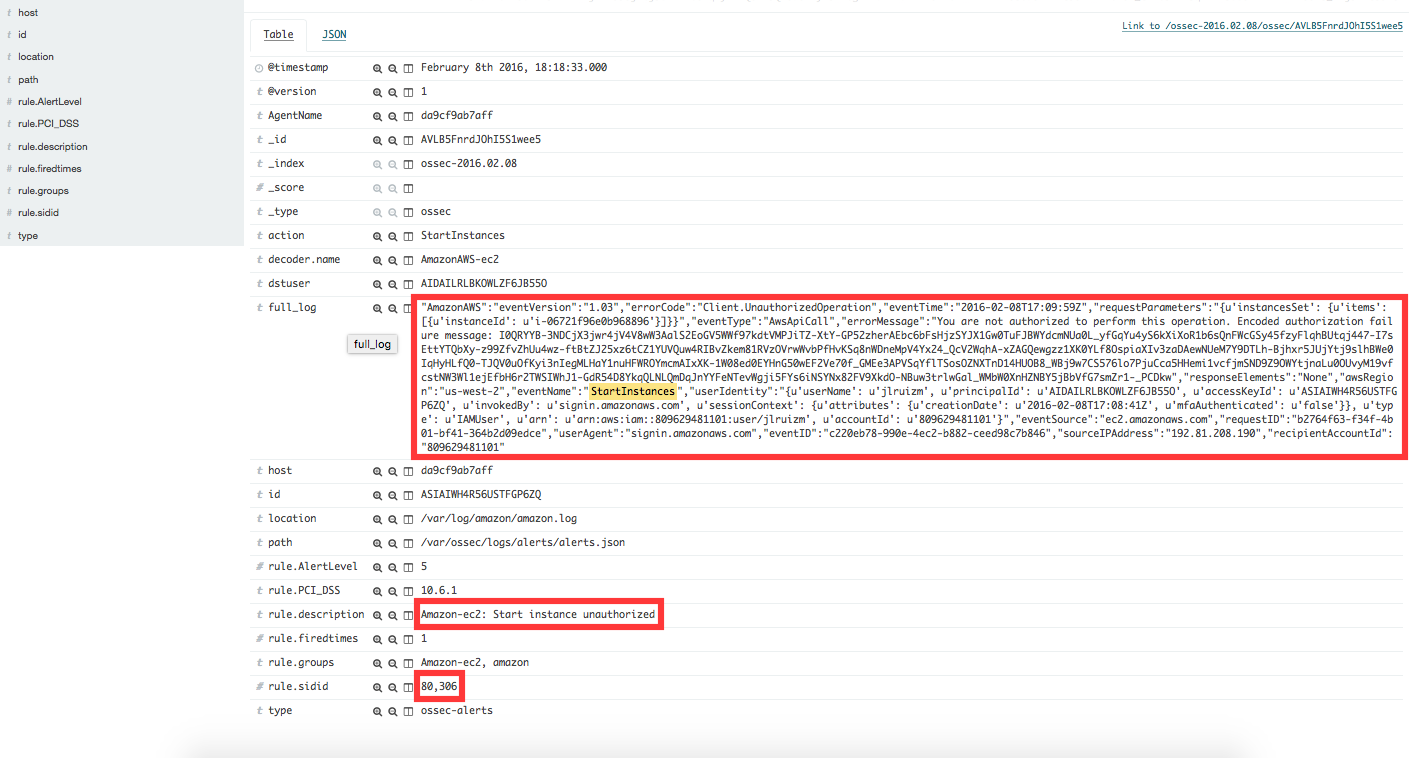
If one user without permissions to start instances tries to start one the rule id 80306 will apply and an alert will be generated as shown below:
| Definition of rule 80306 |
<rule id="80306" level="5">
    <if_sid>80305</if_sid>
    <match>"errorCode":"Client.UnauthorizedOperation"</match>
    <description>Amazon-ec2: Start instance unauthorized</description>
    <group>amazon,pci_dss_10.6.1,</group>
</rule>
|
| Kibana will show this alert |
|
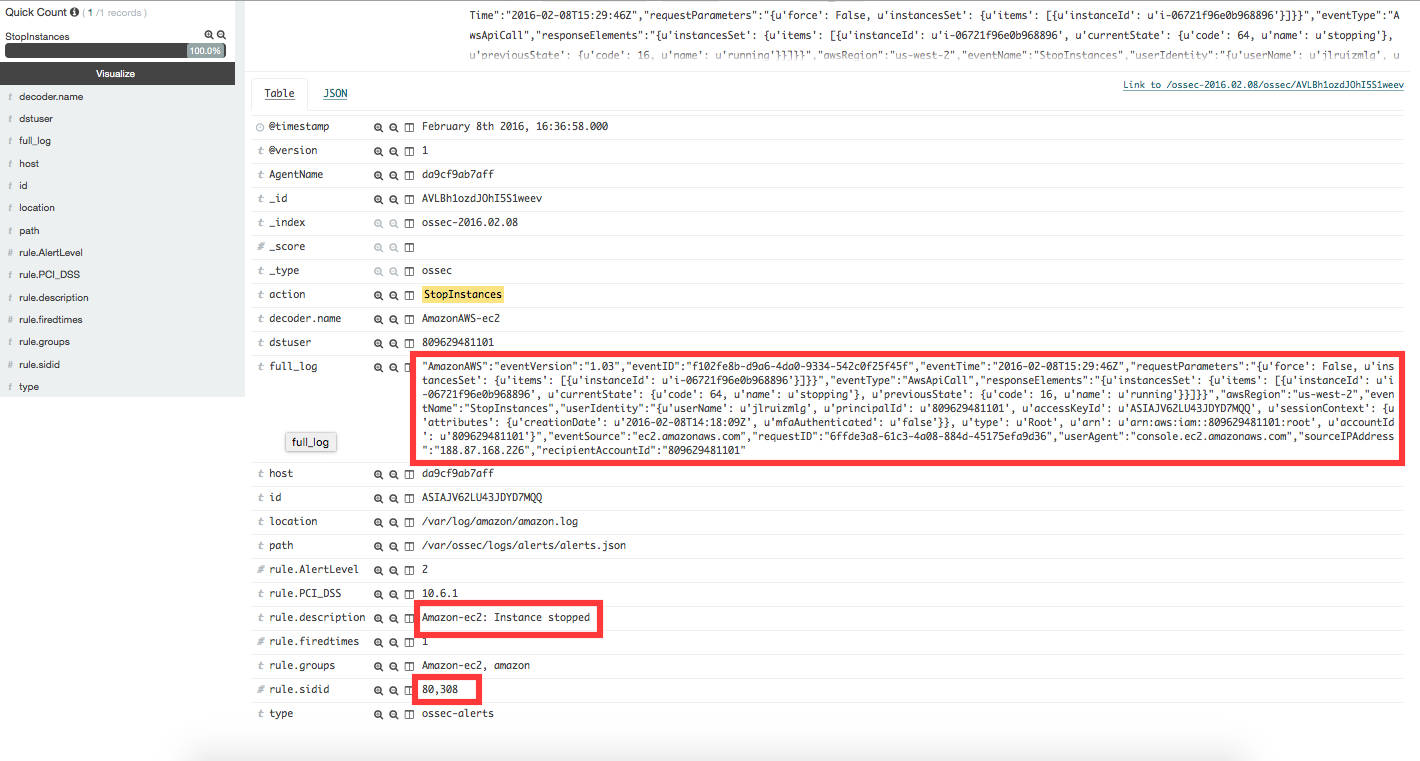
Stop instances in EC2
When one instance in EC2 is stopped, the rule id 80308 will apply and an alert will be generated as shown below:
| Definition of rule 80308 |
<rule id="80308" level="2">
    <if_sid>80300</if_sid>
    <action>StopInstances</action>
    <description>Amazon-ec2: Instance stopped</description>
    <group>amazon,pci_dss_10.6.1,</group>
</rule>
|
| Kibana will show this alert |
|
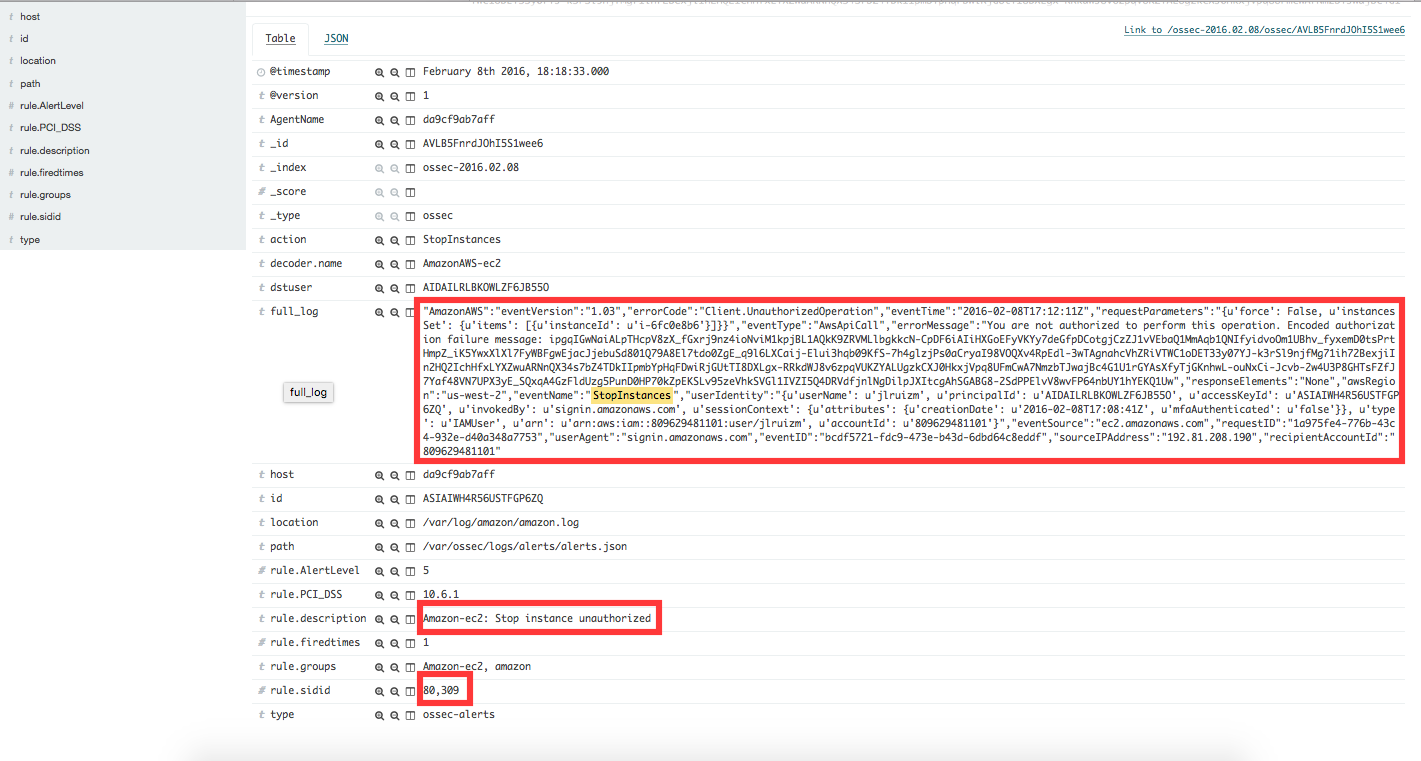
If one user without permissions to start instances tries to start one, the rule id 80309 will apply and an alert will be generated as shown below:
| Definition of rule 80309 |
<rule id="80309" level="5">
    <if_sid>80308</if_sid>
    <action>StopInstances</action>
    <match>"errorCode":"Client.UnauthorizedOperation"</match>
    <description>Amazon-ec2: Stop instance unauthorized</description>
    <group>amazon,pci_dss_10.6.1,</group>
</rule>
|
| Kibana will show this alert |
|
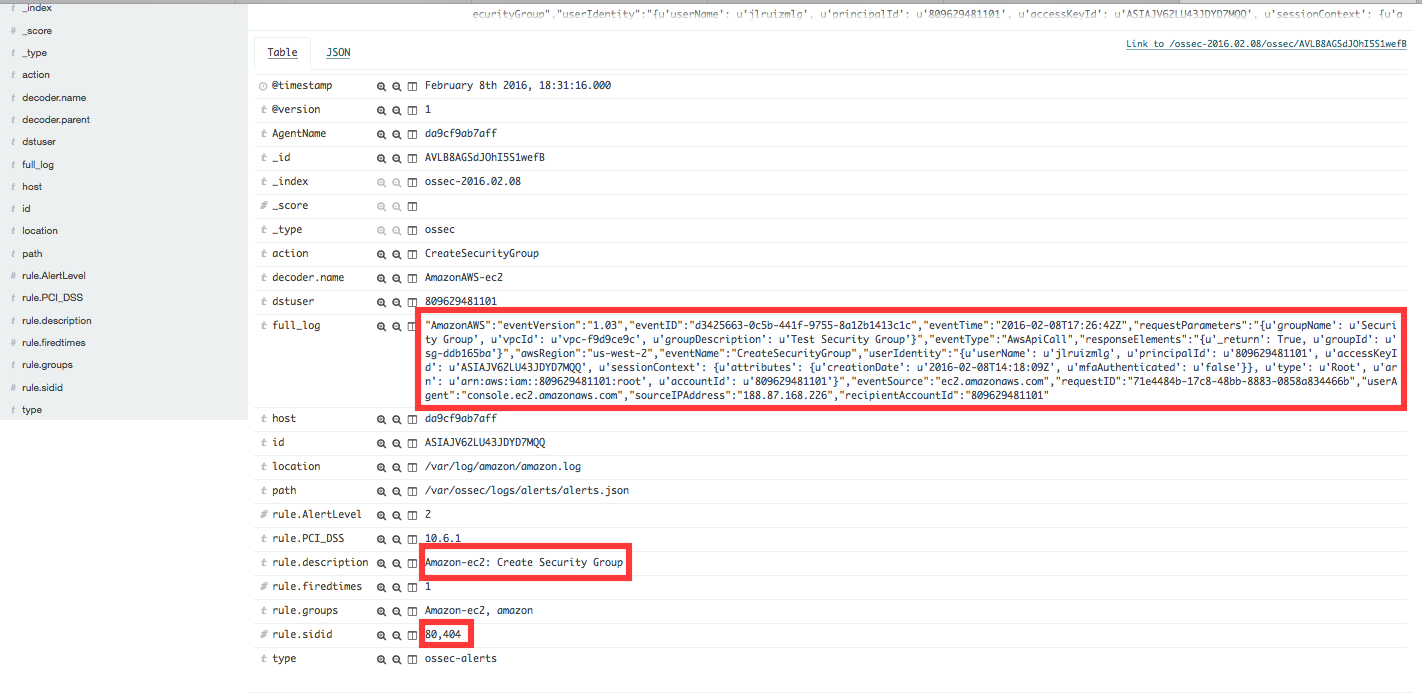
Create Security Groups in EC2
When a new security group is created the rule id 80404 will match the log message generated by this event and an alert will be shown as follows:
| Definition of rule 80404 |
<rule id="80404" level="2">
    <if_sid>80300</if_sid>
    <action>CreateSecurityGroup</action>
    <description>Amazon-ec2: Create Security Group</description>
    <group>amazon,pci_dss_10.6.1,</group>
</rule>
|
| Kibana will show this alert |
|
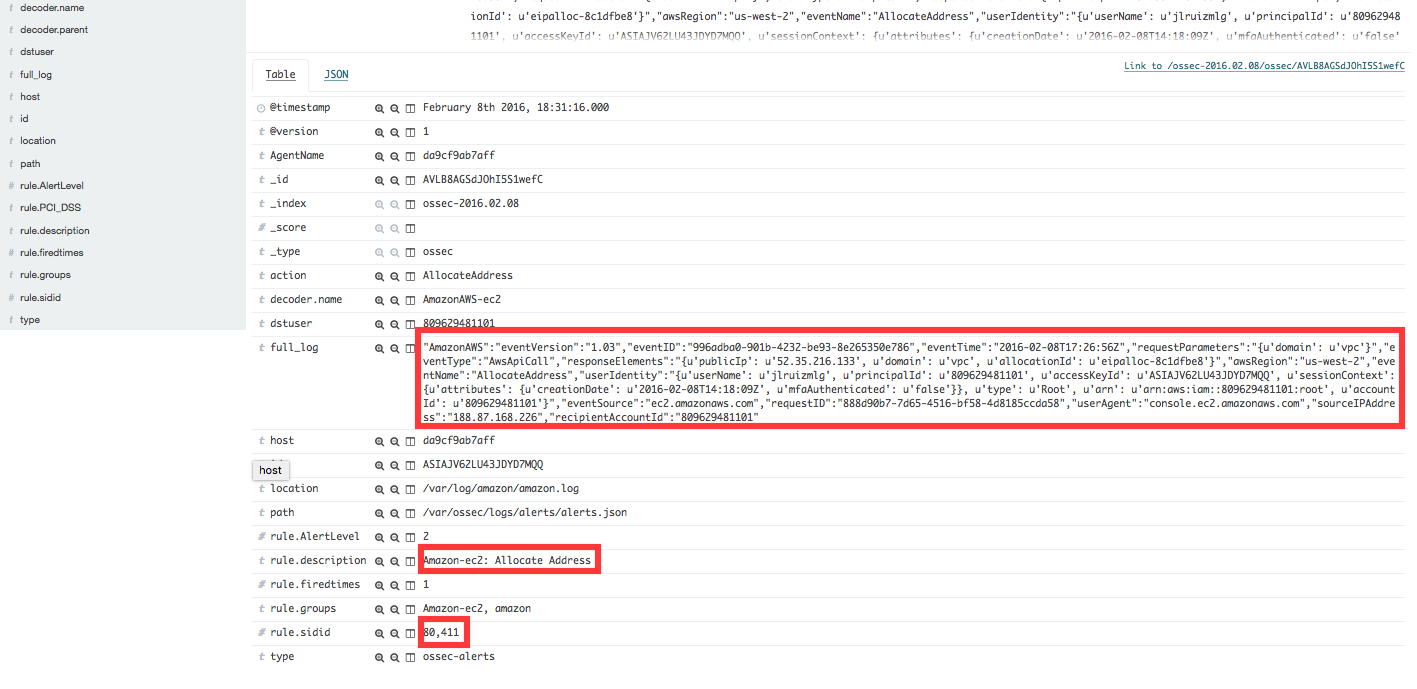
Allocate new Elastic IP’s address
If a new address Elastic IP’s is allocated, then the rule id 80411 will apply:
| Definition of rule 80411 |
<rule id="80411" level="2">
    <if_sid>80300</if_sid>
    <action>AllocateAddress</action>
    <description>Amazon-ec2: Allocate Address</description>
    <group>amazon,</group>
</rule>
|
| Kibana will show this alert |
|
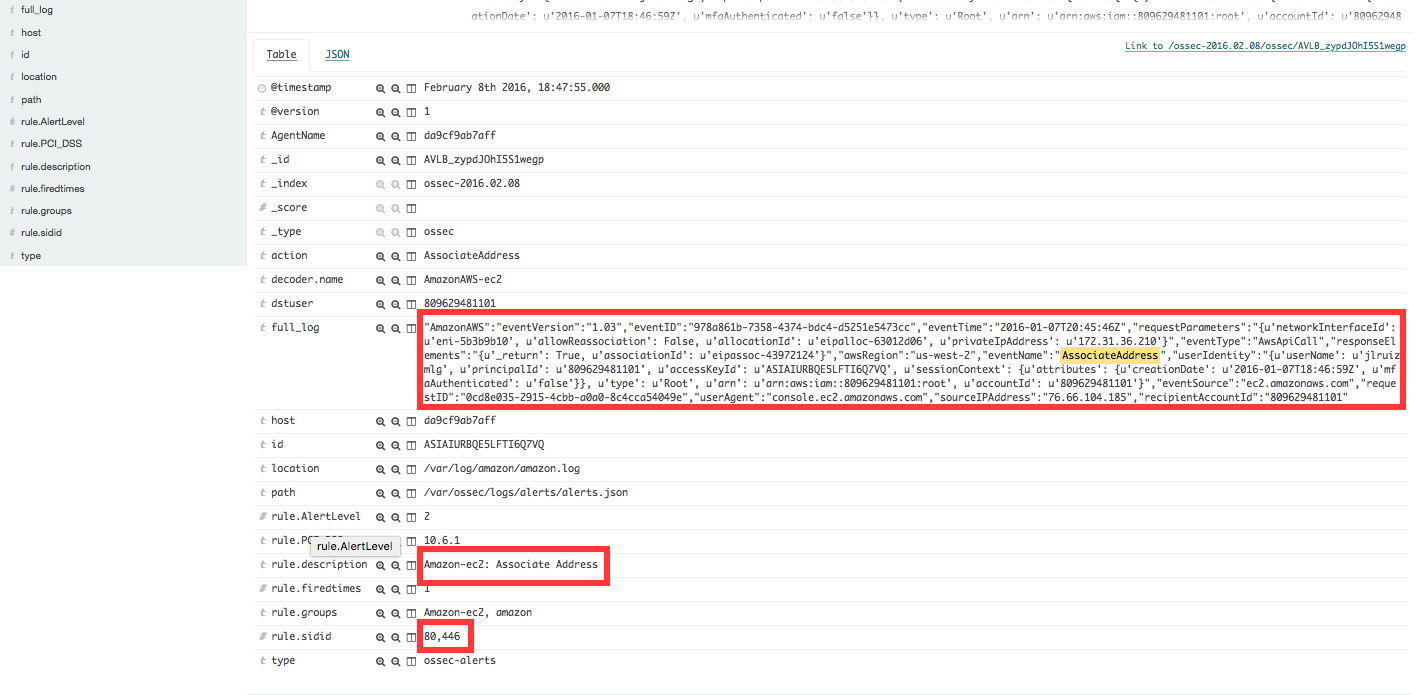
Associate new Elastic IP’s address
If one Elastic IP’s addres is associated, then the rule id 80446 will apply generating the corresponding alert:
| Definition of rule 80446 |
<rule id="80446" level="2">
    <if_sid>80300</if_sid>
    <action>AssociateAddress</action>
    <description>Amazon-ec2: Associate Address</description>
    <group>amazon,pci_dss_10.6.1,</group>
</rule>
|
| Kibana will show this alert |
|
The Kibana Dashboards will show:
| Pie Chart | Stacked Groups |
|---|---|

|
|
VPC Use cases
Amazon Virtual Private Cloud (Amazon VPC) lets you provision a logically isolated section of the Amazon Web Services (AWS) Cloud where you can launch AWS resources in a virtual network that you define. You have complete control over your virtual networking environment, including selection of your own IP address range, creation of subnets, and configuration of route tables and network gateways.
Create VPC
If one VPC is created the rule id 81000 will apply and an alert will be generated as shown below:
| Definition of rule 81000 |
<rule id="81000" level="2">
    <if_sid>80300</if_sid>
    <action>CreateVpc</action>
    <description>Amazon-vpc: Vpc Created</description>
    <group>amazon,pci_dss_10.6.1,</group>
</rule>
|
| Kibana will show this alert |
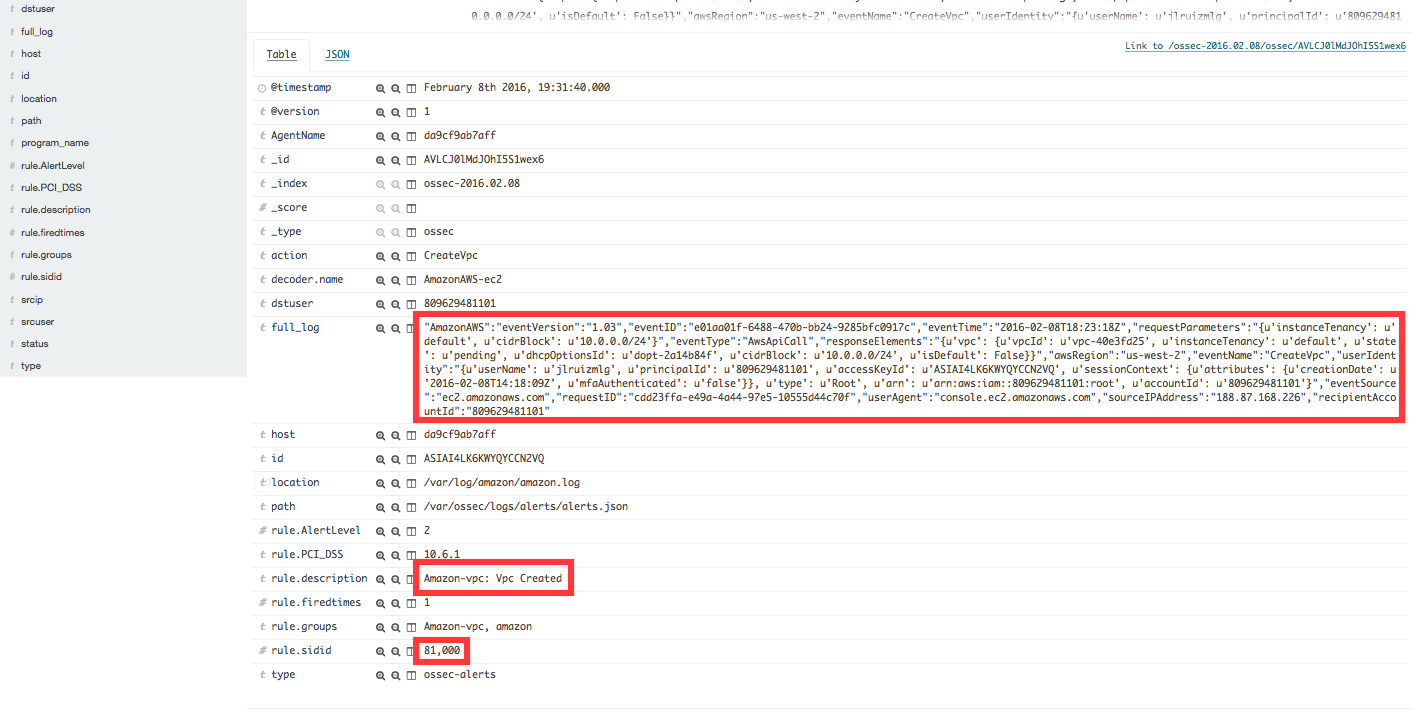
|
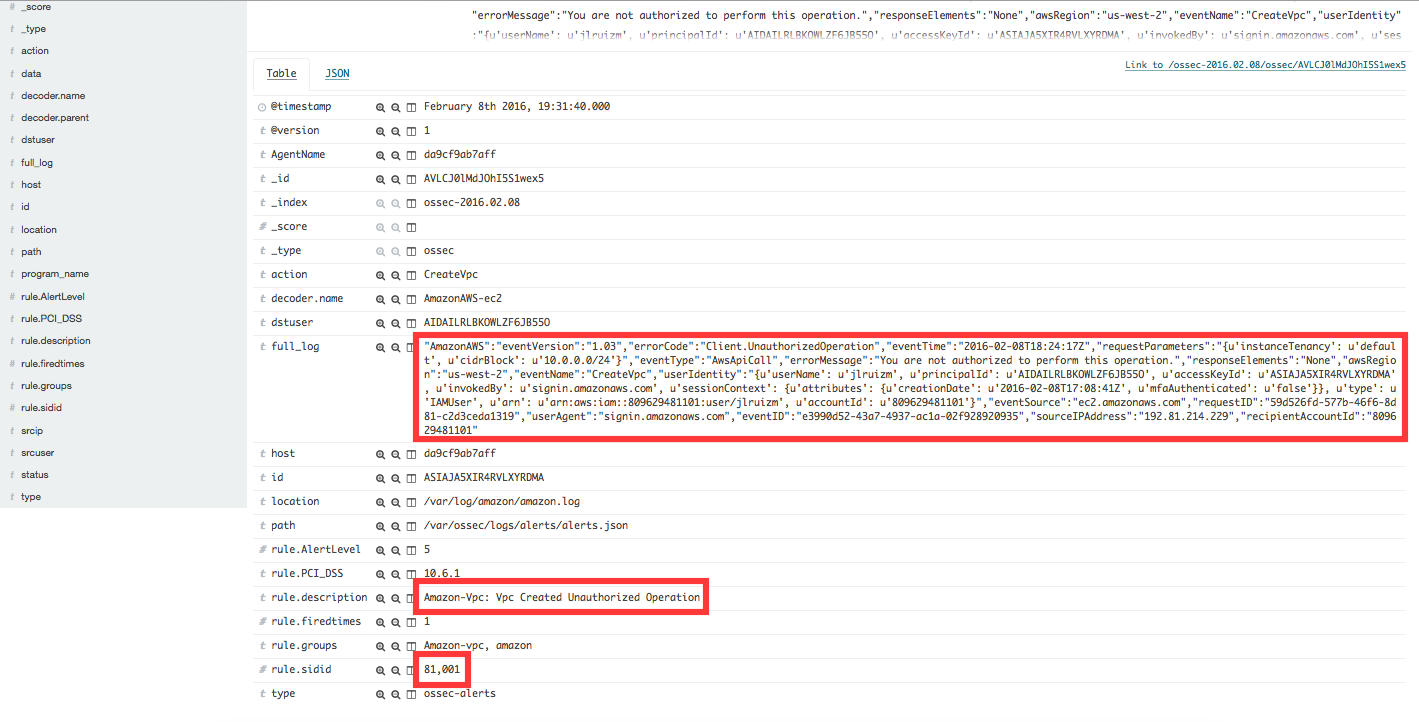
If the user doesn’t have permissions the rule id 81001 will apply:
| Definition of rule 81001 |
<rule id="81001" level="5">
    <if_sid>81000</if_sid>
    <match>"errorCode":"Client.UnauthorizedOperation"</match>
    <description>Amazon-Vpc: Vpc Created Unauthorized Operation</description>
    <group>amazon,pci_dss_10.6.1,</group>
</rule>
|
| Kibana will show this alert |
|
Contribute to the ruleset
If you have created new rules, decoders or rootchecks and you would like to contribute to our repository, please fork our Github repository and submit a pull request.
If you are not familiar with Github, you can also share them through our users mailing list, to which you can subscribe by sending an email to wazuh+subscribe@googlegroups.com. As well, do not hesitate to request new rules or rootchecks that you would like to see running in OSSEC and our team will do our best to make it happen.
Note
In our repository you will find that most of the rules contain one or more groups called pci_dss_X. This is the PCI DSS control related to the rule. We have produced a document that can help you tag each rule with its corresponding PCI requirement: http://www.wazuh.com/resources/PCI_Tagging.pdf
What’s next
Once you have your rules for Amazon AWS up to date we encourage you to move forward and try out ELK integration or the API RESTful, check them on: